HDRShop allows you to create a high-dynamic range image from a sequence of standard 24-bit images taken at different shutter speeds. The images should be taken without moving the camera, and should be bracketed so that the darkest parts of the scene are clearly visible in the longest exposure and the brightest parts of the image are not "blasted out" to white in the shortest exposure.
Once the minimum and maximum exposure levels have been determined, choose an exposure interval. The interval depends on many things, in particular how well the camera's response curve is calibrated. See the tutorial on calibrating the camera's response curve for details. If the response curve isn't known, it is recommended that you take the images in the sequence close to each other, for example 1 stop apart. Once the camera's curve has been well calibrated, you can take the sequence further apart, at 3 stops. As a rule of thumb, you can never take the images too close together, so when in doubt take the sequence 1 stop apart. Then, even if the camera curve isn't calibrated well, you will still get pretty good results.
To begin, pull down the Create menu at the top of the screen, and click on Assemble Image Sequence. This will pop up the "Assemble HDR Image from LDR Sequence" dialog box.
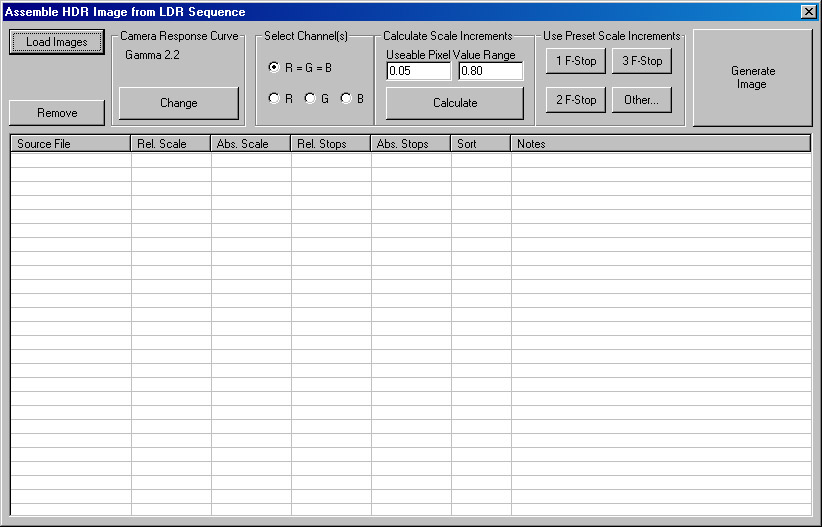
First, you need to load in the LDR image sequence. Click the "Load Images" button and select the entire sequence of images from the file selector. The image file names should now appear in the worksheet in the dialog box.
The images in the worksheet should be in order from shortest exposure to longest exposure. HDRShop will automatically sort the images based on the average brightness of the pixels in each image. This brightness is displayed in the "sort" column. If this order is incorrect for some reason, you can manually enter values into the "sort" column for each image, and HDRShop will sort the images based on the numbers you enter.
Next, you need to specify the response curve of the camera that generated these images. As mentioned above, the can be calculated as described in the previous tutorial. Click on the "Change" button to select that camera resonse curve. If you know that the camera uses a standard gamma curve or a linear curve, you can enter that directly. Click on the "gamma curve" tab and type in the value of the gamma curve. Many camera are close to a 2.2 gamma curve or else they are linear, which is equivalent to a gamma value of 1.0. For better results, you can use a response curve that you have calculated. Click on the "Custom Curve" tab and enter the filename of the curve in the text box, or click "Browse" to select the file. If the "Renormalize Curve" checkbox is selected, HDRShop will automatically rescale the curve so that the maximum value is 1. For assembling an HDR image froma sequence, this check box should always be selected. Once the appropriate curve has been loaded or selected, click "Ok".
Next, you need to tell HDRShop which images were taken at which exposure settings. These values can be specified per color channel, or for the entire image. For most applications, the relative exposure levels of the different color channels will be the same. In the "Select Channels" area, the "R=G=B" button should be selected. If a single color channel is selected, then the values entered in the worksheet will only apply to the currently selected color channel.
The "Calculate" button in the "Calculate Scale Increments" will tell HDRShop to try to automatically figure out the relative exposure values of the images in the sequence. However, it will only work if the images are taken very close together and the camera curve is known. In general, you should know the relative exposure values of the images in the sequence and enter it by hand.
Most of the time, the images in your sequence will all be taken at a fixed f-stop inverals. In this case, press the appropriate button in the "Use Preset Scale Increments" area. If the images were taken at some other f-stop interval, press the "Other..." button and enter the increment by hand.
When the f-stop increment is selected, you notice that the values in the "Relative Stops" column should all be equal to the f-stop value you selected. The column indicates how many f-stops brighter the current image is from the previous image. The "Absolute Stops" column indicates how many stops brighter the image is from the first image in the sequence. Similarly, the "Relative Scale" column indicates how many times brighter the current image is from the previous image, and the "Absolute Scale" indicates how many times brighter the current image is from the first image in the sequence. The scale values are the base-2 log of the f-stop values, since f-stop is an exponential measurement of exposure level. If the images were taken at a non-uniform spacing, you can enter in any of these values by hand by simply clicking on the appropriate cell in the worksheet and typing the value. Note that this will automatically update the other values in the row.
Finally, when the images have been loaded, the camera curve selected, and the relative brightnesses entered, press the "Generate Image" button to compile the images into a single HDR image.